TL;DR:
- Proper site preparation with a well-compacted base is essential for durable and odor-free barn flooring.
- Adequate installation practices, including precise mat fitting and appropriate seam offsetting, prevent shifting and leaks.
- Investing in quality base materials and careful installation significantly extends the lifespan of barn flooring and reduces long-term costs.
Barn flooring that shifts, smells, or creates uneven footing is more than an inconvenience. It puts your horses at risk for leg injuries, hoof problems, and chronic stress. It also drives up bedding costs and makes daily stall cleaning harder than it needs to be. The good news is that most flooring failures trace back to a handful of preventable mistakes during installation, not the materials themselves. This guide walks you through every stage of barn floor installation, from selecting the right tools and base materials to laying mats with precision and maintaining them for the long haul.
Table of Contents
- Essential tools, materials, and site requirements
- Preparing the barn floor base: What works and what to avoid
- How to install stall mats for a perfect, gap-free fit
- Troubleshooting, maintenance, and cost considerations
- Our take: Why barn flooring installation gets overlooked and what really matters
- Ready to upgrade your barn flooring?
- Frequently asked questions
Key Takeaways
| Point | Details |
|---|---|
| Proper base is vital | Use 4–8 inches of compacted gravel or limestone for safe, long-lasting barn floors. |
| Tight mat fit prevents problems | Fitting stall mats with less than 1/4 inch gaps stops shifting and odors. |
| Drainage beats concrete | Compacted stone bases offer better drainage and lower odor risk than concrete. |
| Lifecycle costs matter | Consider bedding needs and long-term upkeep when choosing flooring systems. |
| Routine care is key | Daily wet spot removal and maintenance keep barn floors safe and odor-free. |
Essential tools, materials, and site requirements
With the problems in mind, let’s start by making sure you have everything needed before breaking ground. Proper preparation prevents most of the common failures we see in barn flooring projects. Showing up to the job without the right tools or materials leads to shortcuts, and shortcuts in flooring always come back around.
Tools you’ll need:
- Utility knife with extra blades (thick rubber dulls blades fast)
- Straight edge or carpenter’s square for accurate cuts
- Tape measure, at least 25 feet
- Hand tamper or plate compactor for base preparation
- Wheelbarrow for moving base material
- Level and string line to check slope
- Rubber mallet for seating mats firmly
Materials comparison:
| Material | Thickness | Best Use | Durability |
|---|---|---|---|
| Solid rubber stall mats | 3/4″ to 1″ | Standard stalls | 10+ years |
| Interlocking rubber mats | 3/4″ | High-traffic areas | 8-12 years |
| Stall mattress systems | 2″-4″ foam/rubber | Performance horses | 10-15 years |
| Compacted gravel base | 4″-8″ | Sub-base for all types | Indefinite |
| Limestone screenings | 4″-6″ | Sub-base preferred | Indefinite |
Rubber stall mats are the most recommended flooring surface for horse barns, providing cushioning, non-slip safety, and durability when installed over a proper base. The 3/4 inch to 1 inch thickness range is the industry standard because it balances weight, traction, and fatigue reduction for horses standing for long periods.
Base preparation is critical: use 4 to 8 inches of compacted gravel, crushed stone, or limestone screenings, leveled and sloped for drainage. Skipping or rushing this step is the single most common reason mats shift and odors develop.
For a full breakdown of stall mat installation steps and a side-by-side look at mats vs mattress systems, those resources are worth reviewing before you buy.
Pro Tip: Lay your rubber mats in direct sunlight for 30 to 60 minutes before cutting. Warm rubber is noticeably more flexible, which makes trimming cleaner and fitting tighter.
Preparing the barn floor base: What works and what to avoid
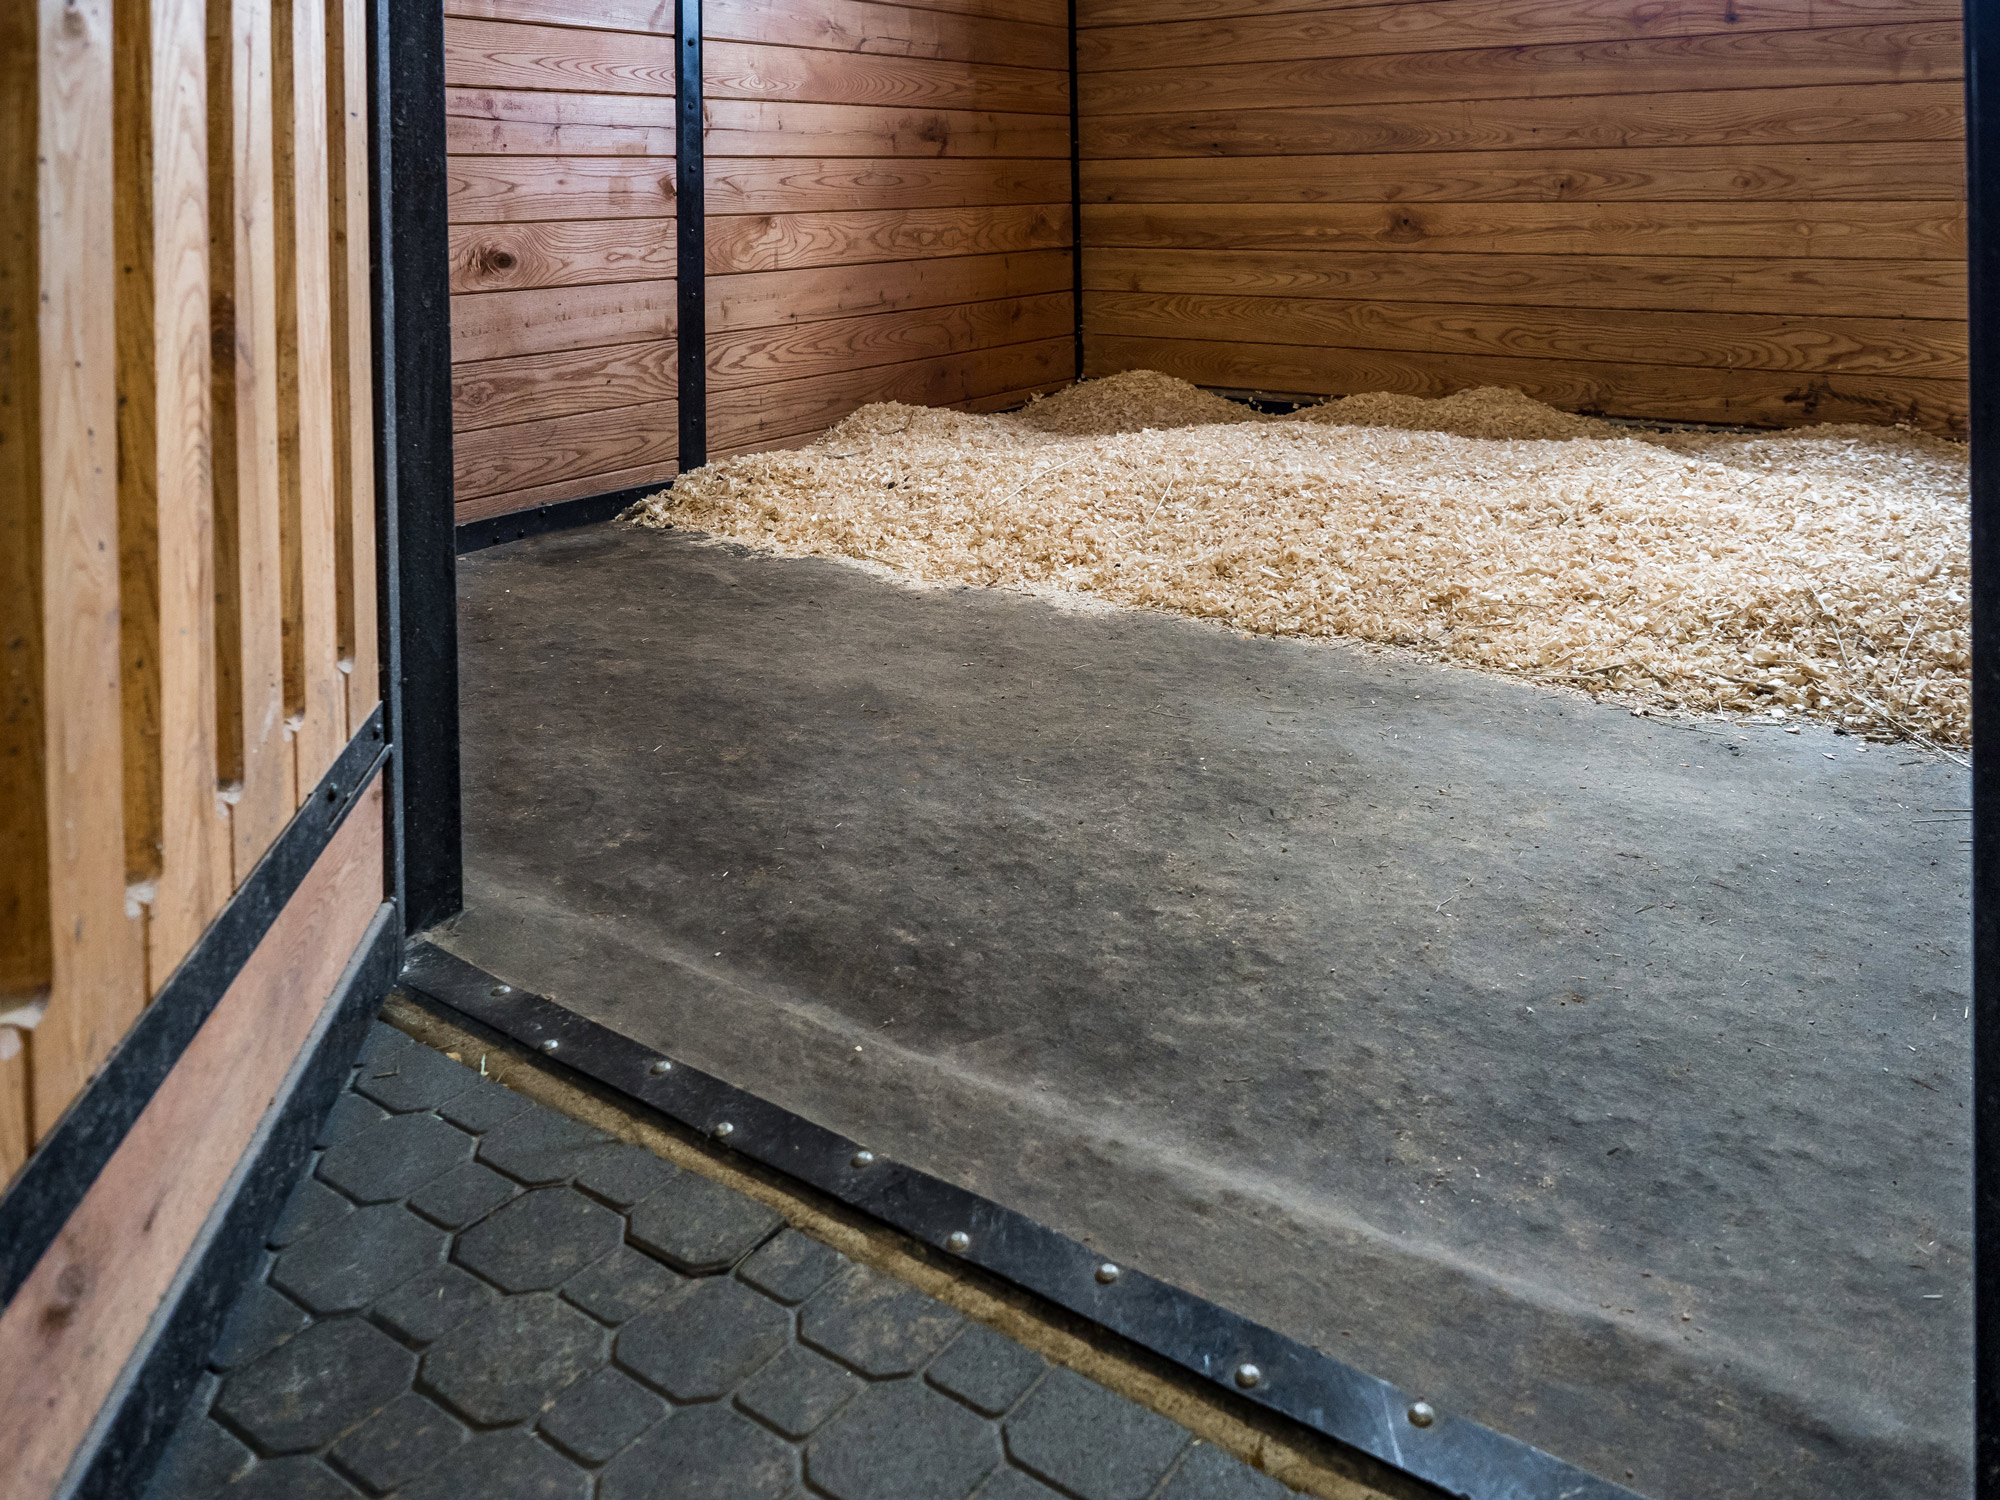
Once supplies are in hand, the next vital step is setting the foundation for everything to come. The base is invisible once mats are down, but it controls drainage, odor, long-term stability, and horse comfort. Many owners invest in high-end mats and then cut corners here. That’s backwards.
Stone and limestone vs. concrete: A direct comparison
| Factor | Compacted stone/limestone | Concrete |
|---|---|---|
| Drainage | Excellent, natural percolation | Poor, requires surface slope |
| Odor retention | Low | High (urine pools underneath) |
| Hoof impact absorption | Good with mats | Hard, reliant entirely on mat |
| Maintenance | Re-tamp and refresh periodically | Difficult to modify |
| Cost for new builds | Lower | Higher upfront |
| Best for | New construction | Retrofitting existing slabs |
Compacted limestone is preferred over concrete for superior drainage, lower odor retention, and the ability to refresh the base over time. Concrete is best for retrofits but presents long-term challenges with ammonia buildup and limited drainage.
Steps to build a proper compacted base:
- Measure the stall dimensions and mark the excavation area
- Excavate to a minimum depth of 6 to 8 inches below finished floor level
- Add a 2 inch layer of coarse gravel for drainage at the bottom
- Layer limestone screenings or crushed stone on top, in 2 inch lifts
- Compact each layer thoroughly with a plate compactor before adding the next
- Check your slope: aim for 1 to 2 percent grade away from walls toward a drainage point
- Finish with a flat, firm surface that shows no soft spots under foot traffic
Important: Concrete bases trap ammonia gas beneath mats, accelerating odor problems and mat degradation. If you’re working with an existing concrete slab, use rubber mats rated for concrete installation and prioritize surface drainage. For new builds, always choose compacted stone.
For guidance on managing water flow in your facility, our resource on barn floor drainage options covers the key decisions involved. You can also review cleaning layout patterns to see how base slope affects daily maintenance.
Pro Tip: Slope the base slightly toward the stall’s back corner or a dedicated drain point. This small detail reduces urine pooling under mats and cuts your ammonia problem significantly.
How to install stall mats for a perfect, gap-free fit
With the base prepped, it’s time for the heart of the floor: the stall mats. Precision here pays off for years. Rushing the layout leads to gaps, shifting mats, and urine seeping into the base.
Step-by-step mat installation:
- Measure the stall length and width carefully, noting any irregular walls or posts
- Sketch a simple layout plan on paper, treating the floor like a tile grid
- Start laying mats from the back corner opposite the door
- Cut mats to fit snugly against walls using a straight edge and sharp utility knife
- Offset seams between rows by at least 12 inches, similar to a brick pattern
- Keep all seams at least 24 inches away from the door threshold
- Check each mat is flush to adjacent mats with no raised edges
- Trim final perimeter mats last, after the interior field is fully laid
- Walk the entire surface and press down any sections that aren’t fully seated
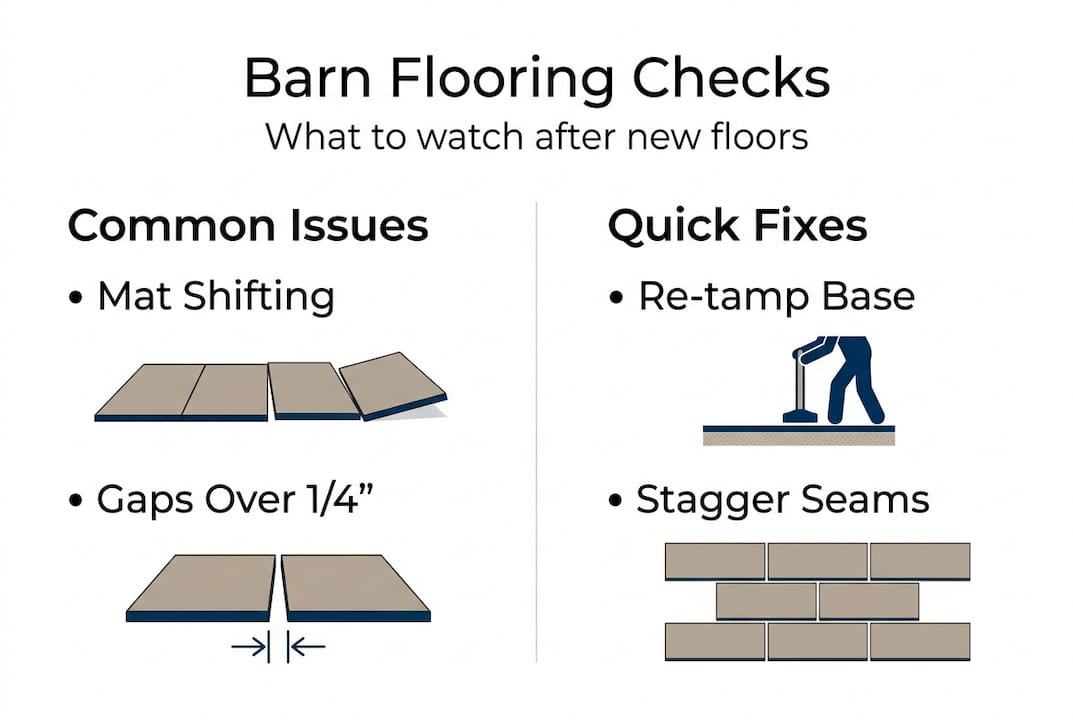
Per installation best practices, no perimeter gap should exceed 1/4 inch. Larger gaps allow urine to seep underneath and create edges that horses can catch a hoof on, which leads to mat shifting over time.
You can use a stall mat calculator to pre-plan your material quantities and minimize waste. For a visual walkthrough of every stage, our detailed rubber mat guide covers each step with additional tips.
Pro Tip: Plan your seam pattern like brickwork before you cut a single mat. Staggered seams distribute weight and movement across the floor more evenly, which prevents individual mats from walking out of position over months of use.
Troubleshooting, maintenance, and cost considerations
After your mats are laid, the job’s not done until you’ve checked for trouble spots and know what to expect in ongoing care and budget. Long-term performance depends on the habits you build in the first few weeks after installation.
10-year cost comparison per stall:
| Flooring type | Estimated 10-year cost | Bedding factor |
|---|---|---|
| Square-edge rubber mats | $10,000 to $13,000 | High bedding use |
| Interlocking rubber mats | $10,000 to $13,000 | High bedding use |
| Stall mattress systems | $6,000 to $7,500 | Significantly reduced bedding |
Ten-year cost benchmarks show that square-edge mats run approximately $10,000 to $13,000 per stall due to high bedding requirements, while mattress systems come in lower at $6,000 to $7,500 because they reduce bedding needs significantly.
Routine maintenance checklist:
- Remove wet spots and soiled bedding daily to prevent ammonia from building under mats
- Lift mats quarterly to inspect the base for soft spots, erosion, or moisture pooling
- Re-tamp base material if you find uneven areas or sinking
- Check all seams and perimeter edges monthly for gaps greater than 1/4 inch
- Replace or reposition any mat that has shifted more than 1/2 inch from its original position
“80% of flooring failures come from poor fit and a poorly prepared base, not from the mat material itself.”
Avoiding gaps over 1/4 inch, maintaining adequate bedding depth, and keeping seams away from the door are the three maintenance habits that protect your investment the most. Thin bedding accelerates wear on mat surfaces and increases the time urine sits on the rubber before absorption.
When you notice mats shifting repeatedly in the same spot, that signals a base problem, not a mat problem. Relaying the mat without fixing the base just delays the issue. Use our guide on fixing installation errors to diagnose and correct base failures properly. For a full cost breakdown, the stall floor costs comparison helps you decide when upgrading to a mattress system makes financial sense.
Our take: Why barn flooring installation gets overlooked and what really matters
Now that you’ve learned the process and pitfalls, here’s what experience has taught us about barn flooring success. After decades of working with farm managers across North America, the pattern is consistent. The barns that struggle with shifting mats, persistent odors, and premature wear almost always cut corners in preparation, not product selection.
We’ve seen facilities spend more per mat than necessary, then install them over a poorly compacted base that wasn’t sloped for drainage. Within a year, ammonia is rising through the seams and mats are rocking under the horses. Conversely, we’ve seen budget mats installed over a meticulously prepared limestone base with tight seams and proper drainage hold up for over a decade with minimal issues.
Tight mat fit and proper base preparation matter more than mat quality alone. Poor installation causes the overwhelming majority of failures involving shifting, odors, and urine seepage.
Drainage, offset seams, and daily spot removal consistently outperform high-end materials that sit on a bad foundation. Our recommendation: invest your time and attention in the base, the layout plan, and the first week of monitoring. That foundation work is what separates a floor that lasts 15 years from one that needs to be relaid after three. Review common install failure issues to make sure you’re not inheriting a problem from a previous installation.
Ready to upgrade your barn flooring?
If you’re ready to turn this guidance into safer, more functional barn floors, we’re here to help at every stage. Whether you’re planning a new build or retrofitting an existing facility, System Equine offers the products, tools, and expertise to get it right.
Explore our range of custom horse stalls designed for safety and long-term durability. Follow along with our complete rubber stall mat guide for detailed installation instructions, or browse our stall flooring layouts to find the pattern that works best for your stall dimensions. Our team is ready to help you plan a floor that protects your horses and simplifies your daily barn routine for years ahead.
Frequently asked questions
What is the best base material for barn stall floors?
Compacted gravel, crushed stone, or limestone screenings are ideal because they provide natural drainage and stability, which prevents the moisture and odor problems that undermine mat performance.
How thick should rubber stall mats be?
Rubber stall mats should be 3/4 inch to 1 inch thick to deliver the cushioning, traction, and durability horses need in a stall environment.
How do I prevent urine smells under barn flooring?
Keep mat gaps under 1/4 inch, maintain adequate bedding, and remove wet spots daily to stop ammonia from penetrating the base and building up over time.
Is concrete a good base for barn flooring?
Concrete is durable but traps odors and limits drainage; compacted stone or limestone is the better choice for new installations where you have the option to choose.
What are the long-term costs of stall mats vs. mattress systems?
Stall mats typically cost $10,000 to $13,000 per stall over 10 years due to higher bedding use, while mattress systems run $6,000 to $7,500 because they reduce how much bedding each stall requires.
Recommended
- Stall Mats vs Stall Mattress: Your Ultimate 10-Year Guide
- How to Install Rubber Stall Mats: Step-by-Step Guide
- Horse Stall Mat Installation & Cleaning Layout Patterns
- Fixing Common Horse Stall Flooring Problems
System Equine — Your Equine Solutions Partner
Don’t forget to follow us on social media to see more of our work!